Developing Plugins ¶¶
This page describes how to write your own FiftyOne plugins.
Note
Check out the FiftyOne plugins repository for a growing collection of plugins that you can use as examples when developing your own.
Design overview ¶¶
Plugins are composed of one or more panels, operators, and components.
Together these building blocks enable you to build full-featured interactive data applications that tailor FiftyOne to your specific use case and workflow. Whether you’re working with images, videos, or other data types, a plugin can help you streamline your machine learning workflows and co-develop your data and models.
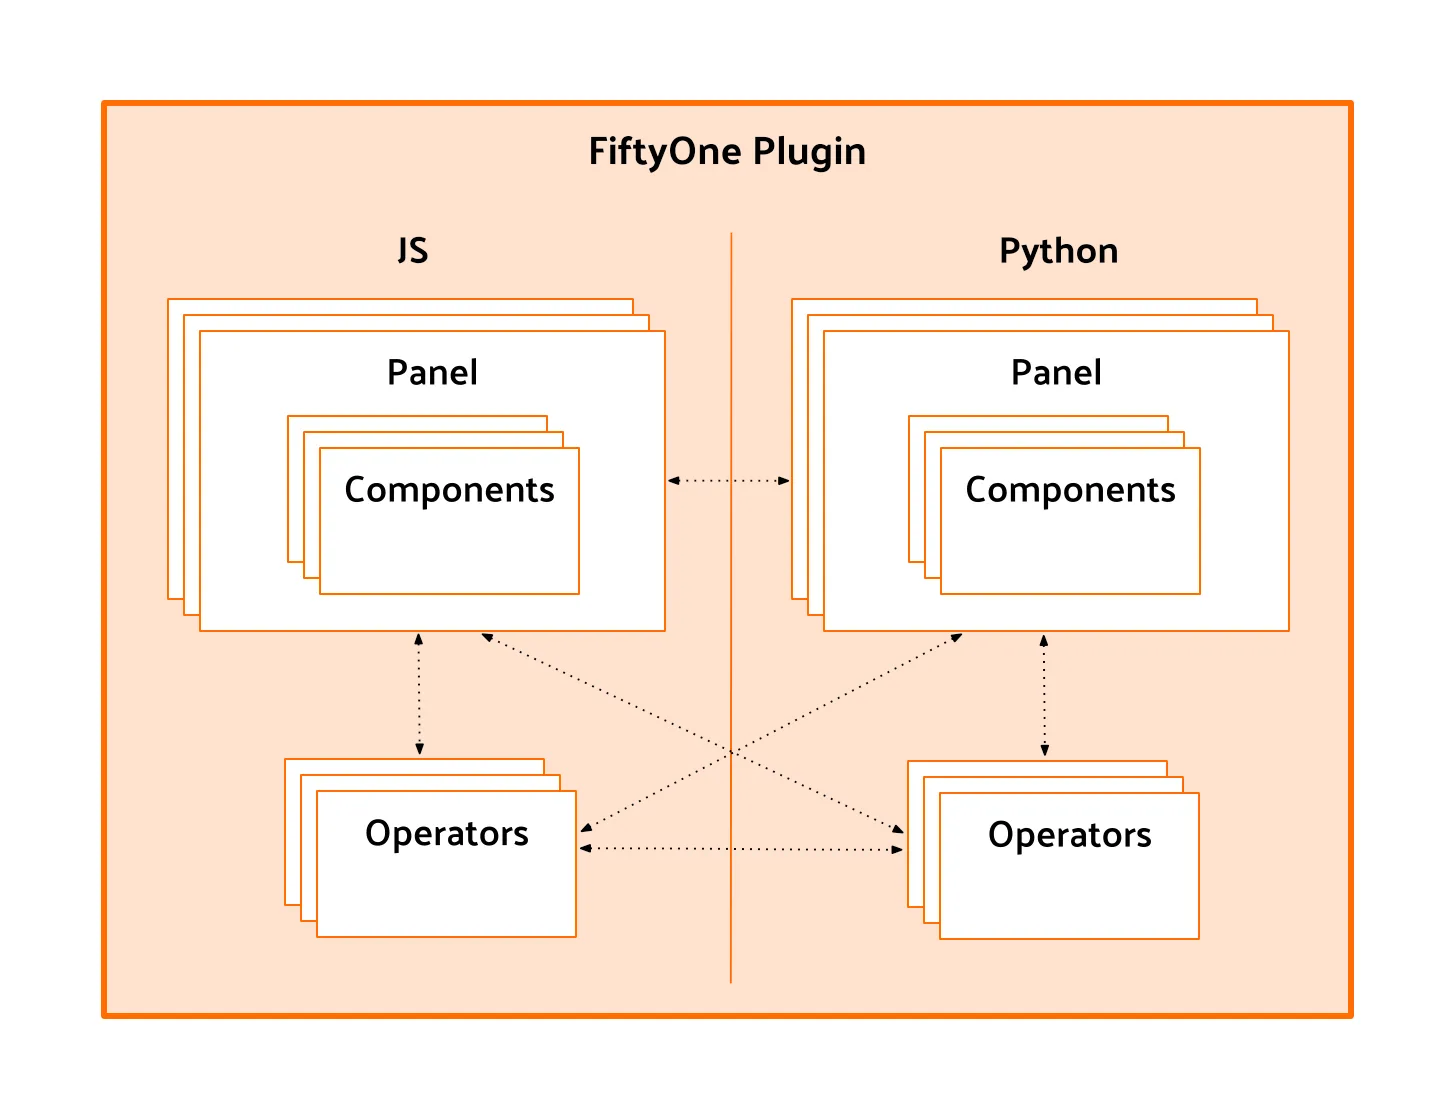
Plugin types ¶¶
FiftyOne plugins can be written in Python or JavaScript (JS), or a combination of both.
Python plugins are built using the fiftyone package, pip packages, and your
own Python. They can consist of panels and operators.
JS plugins are built using the @fiftyone TypeScript packages, npm packages,
and your own TypeScript. They can consist of panels, operators, and custom
components.
Panels ¶¶
Panels are miniature full-featured data applications that you can open in App spaces and interactively manipulate to explore your dataset and update/respond to updates from other spaces that are currently open in the App.
FiftyOne natively includes the following Panels:
-
Samples panel: the media grid that loads by default when you launch the App
-
Histograms panel: a dashboard of histograms for the fields of your dataset
-
Embeddings panel: a canvas for working with embeddings visualizations
-
Map panel: visualizes the geolocation data of datasets that have a
GeoLocationfield
Note
Jump to this section for more information about developing panels.
Operators ¶¶
Operators are user-facing operations that allow you to interact with the data in your dataset. They can range from simple actions like checking a checkbox to more complex workflows such as requesting annotation of samples from a configurable backend. Operators can even be composed of other operators or be used to add functionality to custom panels.
FiftyOne comes with a number of builtin
Python and
JavaScript
operators for common tasks that are intended for either user-facing or internal
plugin use.
Note
Jump to this section for more information about developing operators.
Components ¶¶
Components are responsible for rendering and event handling in plugins. They provide the necessary functionality to display and interact with your plugin in the FiftyOne App. Components also implement form inputs and output rendering for operators, making it possible to customize the way an operator is rendered in the FiftyOne App.
For example, FiftyOne comes with a wide variety of
builtin types that you can leverage to build
complex input and output forms for your operators.
Note
Jump to this section for more information about developing components.
Development setup ¶¶
In order to develop Python plugins, you can use either a release or source install of FiftyOne:
pip install fiftyone
In order to develop JS plugins, you will need a
source install
of FiftyOne and a vite config that links modules to your fiftyone/app
directory.
Note
For JS plugins we recommend forking the FiftyOne Hello World JS Example repository and following the conventions there to build your JS plugin.
Anatomy of a plugin ¶¶
FiftyOne recognizes plugins by searching for fiftyone.yml or fiftyone.yaml
files within your plugins directory.
Below is an example of a plugin directory with a typical Python plugin and JS plugin:
/path/to/your/plugins/dir/
    my-js-plugin/
        fiftyone.yml
        package.json
        dist/
            index.umd.js
    my-py-plugin/
        fiftyone.yml
        __init__.py
        requirements.txt
Note
If the source code for a plugin already exists on disk, you can make it
into a plugin using
create_plugin() or the
fiftyone plugins create CLI command.
This will copy the source code to the plugins directory and create a
fiftyone.yml file for you if one does not already exist. Alternatively,
you can manually copy the code into your plugins directory.
If your FiftyOne App is already running, you may need to restart the server and refresh your browser to see new plugins.
fiftyone.yml ¶¶
All plugins must contain a fiftyone.yml or fiftyone.yaml file, which is
used to define the plugin’s metadata, declare any operators and panels that it
exposes, and declare any secrets that it may require.
The following fields are available:
| Field | Required? | Description |
|---|---|---|
name |
yes | The name of the plugin |
type |
Declare that the directory defines a plugin. This can be omitted forbackwards compatibility, but it is recommended to specify this |
|
author |
The author of the plugin | |
version |
The version of the plugin | |
url |
The remote source (eg GitHub repository) where the directory containing this file is hosted |
|
license |
The license under which the plugin is distributed | |
description |
A brief description of the plugin | |
fiftyone.version |
A semver version specifier (or *) describing the requiredFiftyOne version for the plugin to work properly |
|
operators |
A list of operator names registered by the plugin, if any | |
panels |
A list of panel names registered by the plugin, if any | |
secrets |
A list of secret keys that may be used by the plugin, if any |
For example, the
@voxel51/annotation
plugin’s fiftyone.yml looks like this:
name: "@voxel51/annotation"
type: plugin
author: Voxel51
version: 1.0.0
url: https://github.com/voxel51/fiftyone-plugins/tree/main/plugins/annotation
license: Apache 2.0
description: Utilities for integrating FiftyOne with annotation tools
fiftyone:
  version: ">=0.22"
operators:
  - request_annotations
  - load_annotations
  - get_annotation_info
  - load_annotation_view
  - rename_annotation_run
  - delete_annotation_run
secrets:
  - FIFTYONE_CVAT_URL
  - FIFTYONE_CVAT_USERNAME
  - FIFTYONE_CVAT_PASSWORD
  - FIFTYONE_CVAT_EMAIL
  - FIFTYONE_LABELBOX_URL
  - FIFTYONE_LABELBOX_API_KEY
  - FIFTYONE_LABELSTUDIO_URL
  - FIFTYONE_LABELSTUDIO_API_KEY
Note
Although it is not strictly required, we highly recommend using the
@user-or-org-name/plugin-name naming convention when writing plugins.
Python plugins ¶¶
Python plugins should define the following files:
-
__init__.py(required): entrypoint that defines the Python operators and panels that the plugin defines -
requirements.txt: specifies the Python package requirements to run the plugin
JS plugins ¶¶
JS plugins should define the following files:
-
package.json: a JSON file containing additional information about the plugin, including the JS bundle file path -
dist/index.umd.js: a JS bundle file for the plugin
Publishing plugins ¶¶
You can publish your FiftyOne plugins either privately or publicly by simply uploading the source directory or a ZIP of it to GitHub or another file hosting service.
Note
Want to share your plugin with the FiftyOne community? Make a pull request into the FiftyOne Plugins repository to add it to the Community Plugins list!
Any users with access to the plugin’s hosted location can easily download it via the fiftyone plugins download CLI command:
# Download plugin(s) from a GitHub repository
fiftyone plugins download https://github.com/<user>/<repo>[/tree/branch]

# Download plugin(s) by specifying the GitHub repository details
fiftyone plugins download <user>/<repo>[/<ref>]

# Download specific plugins from a GitHub repository
fiftyone plugins download \\
    https://github.com/<user>/<repo>[/tree/branch] \\
    --plugin-names <name1> <name2> <name3>
Note
GitHub repositories may contain multiple plugins. By default, all plugins that are found within the first three directory levels are installed, but you can select specific ones if desired as shown above.
Quick examples ¶¶
This section contains a few quick examples of plugins before we dive into the full details of the plugin system.
Note
The best way to learn how to write plugins is to use and inspect existing ones. Check out the FiftyOne plugins repository for a growing collection of plugins that you can use as examples when developing your own.
Example plugin ¶¶
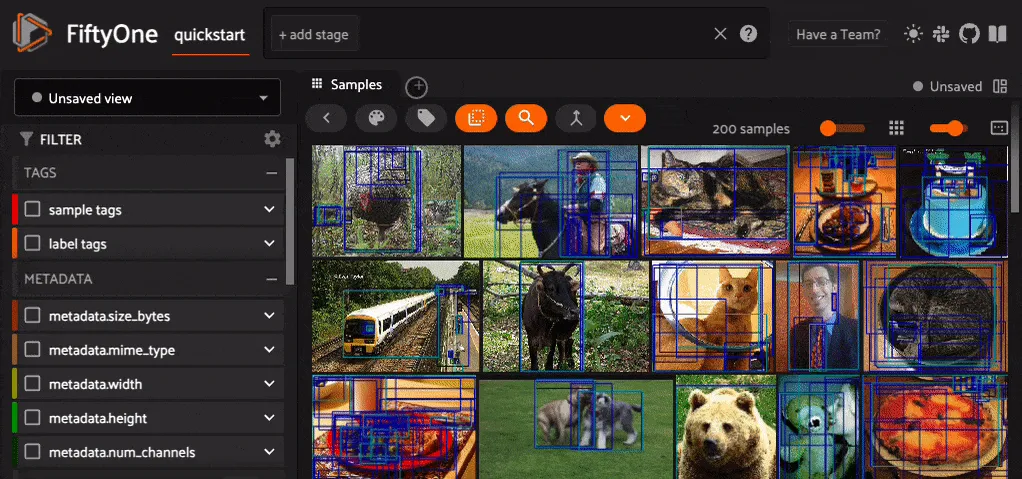
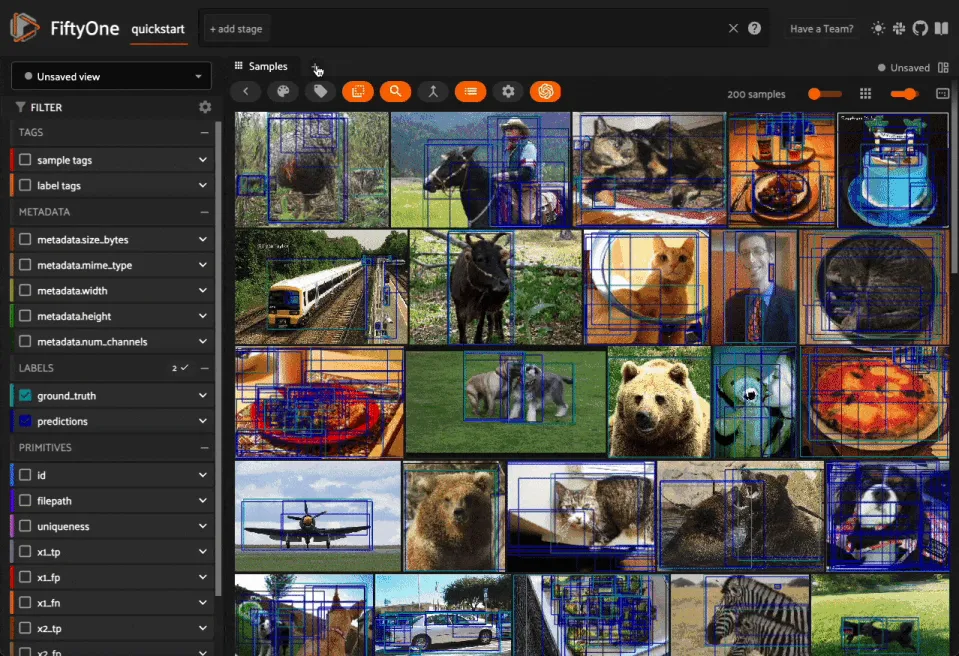
The Hello World plugin defines both a JS Panel and a Python operator:
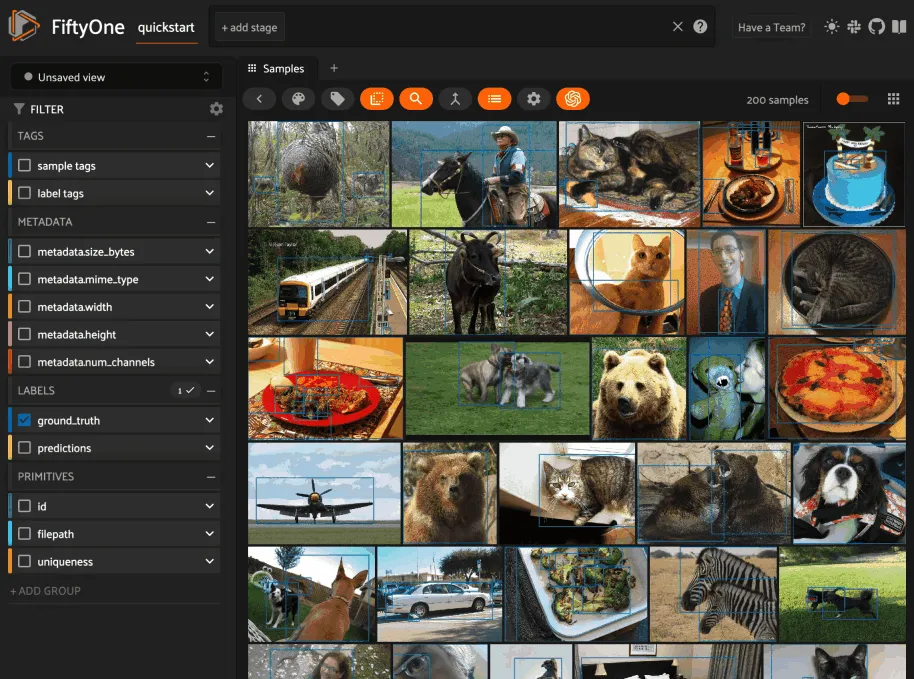
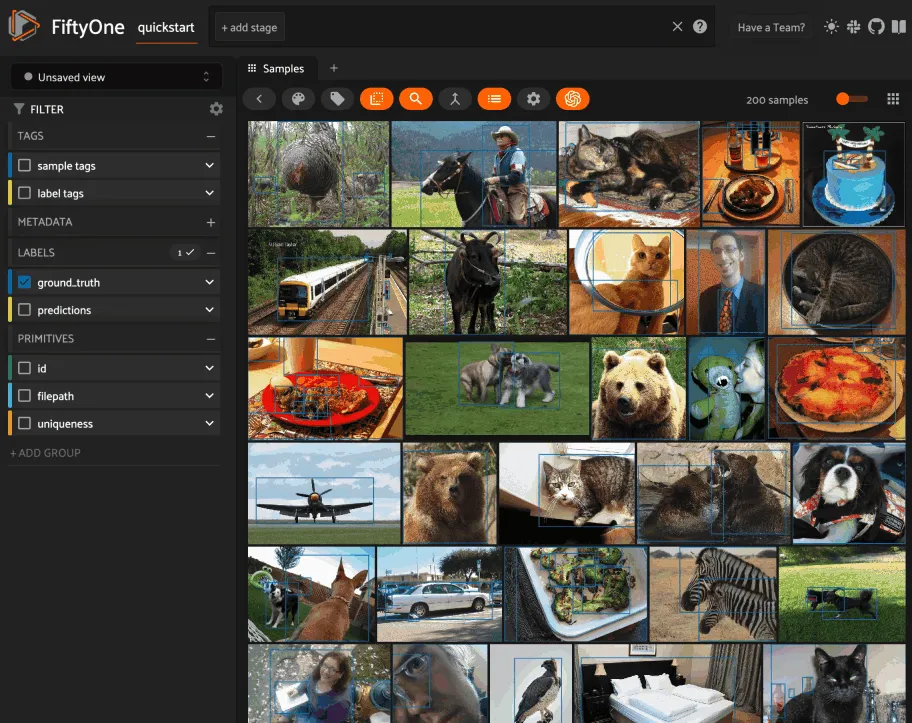
Here’s the plugin in action! The Hello world panel is available under the +
icon next to the Samples tab and the count_samples operator is available in
the operator browser:
Example Python operator ¶¶
Here’s a simple Python operator that accepts a string input and then displays it to the user in the operator’s output modal.
class SimpleInputExample(foo.Operator):
    @property
    def config(self):
        return foo.OperatorConfig(
            name="simple_input_example",
            label="Simple input example",
        )

    def resolve_input(self, ctx):
        inputs = types.Object()
        inputs.str("message", label="Message", required=True)
        header = "Simple input example"
        return types.Property(inputs, view=types.View(label=header))

    def execute(self, ctx):
        return {"message": ctx.params["message"]}

    def resolve_output(self, ctx):
        outputs = types.Object()
        outputs.str("message", label="Message")
        header = "Simple input example: Success!"
        return types.Property(outputs, view=types.View(label=header))

def register(p):
    p.register(SimpleInputExample)
In practice, operators would use the inputs to perform some operation on the current dataset.
Note
Remember that you must also include the operator’s name in the plugin’s fiftyone.yml:
operators:
  - simple_input_example
Example Python panel ¶¶
Here’s a simple Python panel that renders a button that shows a “Hello world!” notification when clicked:
import fiftyone.operators as foo
import fiftyone.operators.types as types

class HelloWorldPanel(foo.Panel):
    @property
    def config(self):
        return foo.PanelConfig(
            name="hello_world_panel",
            label="Hello World Panel"
        )

    def on_load(self, ctx):
        ctx.panel.state.hello_message = "Hello world!"

    def say_hello(self, ctx):
        ctx.ops.notify(ctx.panel.state.hello_message)

    def render(self, ctx):
        panel = types.Object()
        panel.btn(
            "hello_btn",
            label="Say Hello",
            icon="emoji_people",
            on_click=self.say_hello,
            variant="contained",
        )

        panel_view = types.GridView(
            width=100, height=100, align_x="center", align_y="center"
        )
        return types.Property(panel, view=panel_view)

def register(p):
    p.register(HelloWorldPanel)
Note
Remember that you must also include the panel’s name in the plugin’s fiftyone.yml:
panels:
  - hello_world_panel

Example JS operator ¶¶
Here’s how to define a JS operator that sets the
currently selected samples in the App based on a list of sample IDs provided
via a samples parameter.
import {Operator, OperatorConfig, types, registerOperator} from "@fiftyone/operators";
const PLUGIN_NAME = "@my/plugin";

class SetSelectedSamples extends Operator {
    get config(): OperatorConfig {
        return new OperatorConfig({
            name: "set_selected_samples",
            label: "Set selected samples",
            unlisted: true,
        });
    }
    useHooks(): {} {
        return {
            setSelected: fos.useSetSelected(),
        };
    }
    async execute({ hooks, params }: ExecutionContext) {
        hooks.setSelected(params.samples);
    }
}

registerOperator(SetSelectedSamples, PLUGIN_NAME);
Unlike Python operators, JS operators can use React hooks and the @fiftyone/*
packages by defining a useHook() method. Any values return in this method
will be available to the operator’s execute() method via ctx.hooks.
Note
Marking the operator as unlisted omits it from the
operator browser, which is useful when the
operator is intended only for internal use by other plugin components.
Developing operators ¶¶
Operators allow you to define custom operations that accept parameters via input properties, execute some actions based on them, and optionally return outputs. They can be executed by users in the App or triggered internally by other operators.
Operators can be defined in either Python or JS, and FiftyOne comes with a
number of builtin Python and
JS
operators for common tasks.
The fiftyone.operators.types module and
@fiftyone/operators package define a rich
builtin type system that operator developers can use to define the input and
output properties of their operators without the need to build custom user
interfaces from scratch. These types handle all aspects of input collection,
validation, and component rendering for you.
Operators can be composed for coordination between Python and the FiftyOne App, such as triggering a reload of samples/view to update the app with the changes made by the operator. Operators can also be scheduled to run by an orchestrator or triggered by other operators.
Operator interface ¶¶
The code block below describes the Python interface for defining operators. We’ll dive into each component of the interface in more detail in the subsequent sections.
Note
The JS interface for defining operators is analogous. See this example JS operator for details.
import fiftyone.operators as foo
import fiftyone.operators.types as types

class ExampleOperator(foo.Operator):
    @property
    def config(self):
        return foo.OperatorConfig(
            # The operator's URI: f"{plugin_name}/{name}"
            name="example_operator",  # required

            # The display name of the operator
            label="Example operator",  # required

            # A description for the operator
            description="An example description"

            # Whether to re-execute resolve_input() after each user input
            dynamic=True/False,  # default False

            # Whether the operator's execute() method returns a generator
            # that should be iterated over until exhausted
            execute_as_generator=True/False,  # default False

            # Whether to hide this operator from the App's operator browser
            # Set this to True if the operator is only for internal use
            unlisted=True/False,  # default False

            # Whether the operator should be executed every time a new App
            # session starts
            on_startup=True/False,  # default False

            # Whether the operator should be executed every time a new
            # dataset is opened in the App
            on_dataset_open=True/False,  # default False

            # Custom icons to use
            # Can be a URL, a local path in the plugin directory, or the
            # name of a MUI icon: https://marella.me/material-icons/demo
            icon="/assets/icon.svg",
            light_icon="/assets/icon-light.svg",  # light theme only
            dark_icon="/assets/icon-dark.svg",  # dark theme only

            # Whether the operator supports immediate and/or delegated execution
            allow_immediate_execution=True/False,    # default True
            allow_delegated_execution=True/False,    # default False
            default_choice_to_delegated=True/False,  # default False
            resolve_execution_options_on_change=None,
        )

    def resolve_placement(self, ctx):
        """You can optionally implement this method to configure a button
        or icon in the App that triggers this operator.

        By default the operator only appears in the operator browser
        (unless it is unlisted).

        Returns:
            a `types.Placement`
        """
        return types.Placement(
            # Make operator appear in the actions row above the sample grid
            types.Places.SAMPLES_GRID_SECONDARY_ACTIONS,

            # Use a button as the operator's placement
            types.Button(
                # A label for placement button visible on hover
                label="Open Histograms Panel",

                # An icon for the button
                # The default is a button with the `label` displayed
                icon="/assets/icon.svg",

                # If False, don't show the operator's input prompt when we
                # do not require user input
                prompt=True/False  # False
            )
        )

    def resolve_input(self, ctx):
        """Implement this method to collect user inputs as parameters
        that are stored in `ctx.params`.

        Returns:
            a `types.Property` defining the form's components
        """
        inputs = types.Object()

        # Use the builtin `types` and the current `ctx.params` to define
        # the necessary user input data
        inputs.str("key", ...)

        # When `dynamic=True`, you'll often use the current `ctx` to
        # conditionally render different components
        if ctx.params["key"] == "value" and len(ctx.view) < 100:
            # do something
        else:
            # do something else

        return types.Property(inputs, view=types.View(label="Example operator"))

    def resolve_delegation(self, ctx):
        """Implement this method if you want to programmatically *force*
        this operation to be delegated or executed immediately.

        Returns:
            whether the operation should be delegated (True), run
            immediately (False), or None to defer to
            `resolve_execution_options()` to specify the available options
        """
        return len(ctx.view) > 1000  # delegate for larger views

    def resolve_execution_options(self, ctx):
        """Implement this method if you want to dynamically configure the
        execution options available to this operator based on the current
        `ctx`.

        Returns:
            an `ExecutionOptions` instance
        """
        should_delegate = len(ctx.view) > 1000  # delegate for larger views
        return foo.ExecutionOptions(
            allow_immediate_execution=True,
            allow_delegated_execution=True,
            default_choice_to_delegated=should_delegate,
        )

    def execute(self, ctx):
        """Executes the actual operation based on the hydrated `ctx`.
        All operators must implement this method.

        This method can optionally be implemented as `async`.

        Returns:
            an optional dict of results values
        """
        # Use ctx.params, ctx.dataset, ctx.view, etc to perform the
        # necessary computation
        value = ctx.params["key"]
        view = ctx.view
        n = len(view)

        # Use ctx.ops to trigger builtin operations
        ctx.ops.clear_selected_samples()
        ctx.ops.set_view(view=view)

        # Use ctx.trigger to call other operators as necessary
        ctx.trigger("operator_uri", params={"key": value})

        # If `execute_as_generator=True`, this method may yield multiple
        # messages
        for i, sample in enumerate(current_view, 1):
            # do some computation
            yield ctx.ops.set_progress(progress=i/n)

        yield ctx.ops.reload_dataset()

        return {"value": value, ...}

    def resolve_output(self, ctx):
        """Implement this method if your operator renders an output form
        to the user.

        Returns:
            a `types.Property` defining the components of the output form
        """
        outputs = types.Object()

        # Use the builtin `types` and the current `ctx.params` and
        # `ctx.results` as necessary to define the necessary output form
        outputs.define_property("value", ...)

        return types.Property(outputs, view=types.View(label="Example operator"))

def register(p):
    """Always implement this method and register() each operator that your
    plugin defines.
    """
    p.register(ExampleOperator)
Note
Remember that you must also include the operator’s name in the plugin’s fiftyone.yml:
operators:
  - example_operator
Operator config ¶¶
Every operator must define a
config property that
defines its name, display name, and other optional metadata about its
execution:
@property
def config(self):
    return foo.OperatorConfig(
        # The operator's URI: f"{plugin_name}/{name}"
        name="example_operator",  # required

        # The display name of the operator
        label="Example operator",  # required

        # A description for the operator
        description="An example description"

        # Whether to re-execute resolve_input() after each user input
        dynamic=True/False,  # default False

        # Whether the operator's execute() method returns a generator
        # that should be iterated over until exhausted
        execute_as_generator=True/False,  # default False

        # Whether to hide this operator from the App's operator browser
        # Set this to True if the operator is only for internal use
        unlisted=True/False,  # default False

        # Whether the operator should be executed every time a new App
        # session starts
        on_startup=True/False,  # default False

        # Whether the operator should be executed every time a new dataset
        # is opened in the App
        on_dataset_open=True/False,  # default False

        # Custom icons to use
        # Can be a URL, a local path in the plugin directory, or the
        # name of a MUI icon: https://marella.me/material-icons/demo
        icon="/assets/icon.svg",
        light_icon="/assets/icon-light.svg",  # light theme only
        dark_icon="/assets/icon-dark.svg",  # dark theme only

        # Whether the operator supports immediate and/or delegated execution
        allow_immediate_execution=True/False,    # default True
        allow_delegated_execution=True/False,    # default False
        default_choice_to_delegated=True/False,  # default False
        resolve_execution_options_on_change=None,
    )
Execution context ¶¶
An ExecutionContext is
passed to each of the operator’s methods at runtime. This ctx contains static
information about the current state of the App (dataset, view, panel,
selection, etc) as well as dynamic information about the current parameters and
results.
An ExecutionContext
contains the following properties:
-
ctx.params: a dict containing the operator’s current input parameter values -
ctx.dataset_name: the name of the current dataset -
ctx.dataset- the currentDatasetinstance -
ctx.view- the currentDatasetViewinstance -
ctx.spaces- the current Spaces layout in the App -
ctx.current_sample- the ID of the active sample in the App modal, if any -
ctx.selected- the list of currently selected samples in the App, if any -
ctx.selected_labels- the list of currently selected labels in the App, if any -
ctx.extended_selection- the extended selection of the view, if any -
ctx.group_slice- the active group slice in the App, if any -
ctx.user_id- the ID of the user that invoked the operator, if known -
ctx.user- an object of information about the user that invoked the operator, if known, including the user’sid,name,email,role, anddataset_permission -
ctx.user_request_token- the request token authenticating the user executing the operation, if known -
ctx.panel_id- the ID of the panel that invoked the operator, if any -
ctx.panel- aPanelRefinstance that you can use to read and write the state and data of the current panel, if the operator was invoked from a panel -
ctx.delegated- whether the operation was delegated -
ctx.requesting_delegated_execution- whether delegated execution was requested for the operation -
ctx.delegation_target- the orchestrator to which the operation should be delegated, if applicable -
ctx.ops- anOperationsinstance that you can use to trigger builtin operations on the current context -
ctx.trigger- a method that you can use to trigger arbitrary operations on the current context -
ctx.secrets- a dict of secrets for the plugin, if any -
ctx.results- a dict containing the outputs of theexecute()method, if it has been called -
ctx.hooks(JS only) - the return value of the operator’suseHooks()method
Operator inputs ¶¶
Operators can optionally implement
resolve_input()
to define user input forms that are presented to the user as a modal in the App
when the operator is invoked.
The basic objective of
resolve_input()
is to populate the ctx.params dict with user-provided parameter values, which
are retrieved from the various subproperties of the
Property returned by the method
( inputs in the examples below).
The fiftyone.operators.types module defines a rich builtin type system
that you can use to define the necessary input properties. These types handle
all aspects of input collection, validation, and component rendering for you!
For example, here’s a simple example of collecting a single string input from the user:
def resolve_input(self, ctx):
    inputs = types.Object()
    inputs.str("message", label="Message", required=True)
    return types.Property(inputs, view=types.View(label="Static example"))

def execute(self, ctx):
    the_message = ctx.params["message"]
If the operator’s config declares dynamic=True, then
resolve_input()
will be called after each user input, which allows you to construct dynamic
forms whose components may contextually change based on the already provided
values and any other aspects of the
execution context:
import fiftyone.brain as fob

def resolve_input(self, ctx):
    inputs = types.Object()
    brain_keys = ctx.dataset.list_brain_runs()

    if not brain_keys:
        warning = types.Warning(label="This dataset has no brain runs")
        prop = inputs.view("warning", warning)
        prop.invalid = True  # so form's `Execute` button is disabled
        return

    choices = types.DropdownView()
    for brain_key in brain_keys:
        choices.add_choice(brain_key, label=brain_key)

    inputs.str(
        "brain_key",
        required=True,
        label="Brain key",
        description="Choose a brain key to use",
        view=choices,
    )

    brain_key = ctx.params.get("brain_key", None)
    if brain_key is None:
        return  # single `brain_key`

    info = ctx.dataset.get_brain_info(brain_key)

    if isinstance(info.config, fob.SimilarityConfig):
        # We found a similarity config; render some inputs specific to that
        inputs.bool(
            "upgrade",
            label"Compute visualization",
            description="Generate an embeddings visualization for this index?",
            view=types.CheckboxView(),
        )

    return types.Property(inputs, view=types.View(label="Dynamic example"))
Remember that properties automatically handle validation for you. So if you
configure a property as required=True but the user has not provided a value,
the property will automatically be marked as invalid=True. The operator’s
Execute button will be enabled if and only if all input properties are valid
(recursively searching nested objects).
Note
As the example above shows, you can manually set a property to invalid by
setting its invalid property.
Note
Avoid expensive computations in
resolve_input()
or else the form may take too long to render, especially for dynamic inputs
where the method is called after every user input.
Delegated execution ¶¶
By default, operations are executed immediately after their inputs are provided in the App or they are triggered programmatically.
However, many interesting operations like model inference, embeddings computation, evaluation, and exports are computationally intensive and/or not suitable for immediate execution.
In such cases, delegated operations come to the rescue by allowing users to schedule potentially long-running tasks that are executed in the background while you continue to use the App.
Note
FiftyOne Teams deployments come out of the box with a connected compute cluster for executing delegated operations at scale.
In FiftyOne Open Source, you can use delegated operations at small scale by running them locally.
There are a variety of options available for configuring whether a given operation should be delegated or executed immediately.
Execution options ¶¶
You can provide the optional properties described below in the operator’s config to specify the available execution modes for the operator:
@property
def config(self):
    return foo.OperatorConfig(
        # Other parameters...

        # Whether to allow immediate execution
        allow_immediate_execution=True/False,    # default True

        # Whether to allow delegated execution
        allow_delegated_execution=True/False,    # default False

        # Whether the default execution mode should be delegated, if both
        # options are available
        default_choice_to_delegated=True/False,  # default False

        # Whether to resolve execution options dynamically when the
        # operator's inputs change. By default, this behavior will match
        # the operator's ``dynamic`` setting
        resolve_execution_options_on_change=True/False/None,  # default None
    )
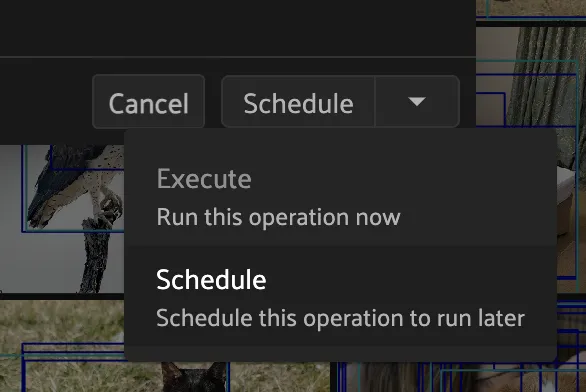
When the operator’s input form is rendered in the App, the Execute|Schedule
button at the bottom of the modal will contextually show whether the operation
will be executed immediately, scheduled for delegated execution, or allow the
user to choose between the supported options if there are multiple:
Dynamic execution options ¶¶
Operators may also implement
resolve_execution_options()
to dynamically configure the available execution options based on the current
execution context:
# Option 1: recommend delegation for larger views
def resolve_execution_options(self, ctx):
    should_delegate = len(ctx.view) > 1000
    return foo.ExecutionOptions(
        allow_immediate_execution=True,
        allow_delegated_execution=True,
        default_choice_to_delegated=should_delegate,
    )

# Option 2: force delegation for larger views
def resolve_execution_options(self, ctx):
    delegate = len(ctx.view) > 1000
    return foo.ExecutionOptions(
        allow_immediate_execution=not delegate,
        allow_delegated_execution=delegate,
    )
If implemented, this method will override any static execution parameters included in the operator’s config as described in the previous section.
Forced delegation ¶¶
Operators can implement
resolve_delegation()
to force a particular operation to be delegated (by returning True) or
executed immediately (by returning False) based on the current execution
context.
For example, you could decide whether to delegate execution based on the size of the current view:
def resolve_delegation(self, ctx):
    # Force delegation for large views and immediate execution for small views
    return len(ctx.view) > 1000
If resolve_delegation()
is not implemented or returns None, then the choice of execution mode is
deferred to the prior mechanisms described above.
Reporting progress ¶¶
Delegated operations can report their execution progress by calling
set_progress()
on their execution context from within
execute():
import fiftyone as fo
import fiftyone.core.storage as fos
import fiftyone.core.utils as fou

def execute(self, ctx):
    images_dir = ctx.params["images_dir"]

    filepaths = fos.list_files(images_dir, abs_paths=True, recursive=True)

    num_added = 0
    num_total = len(filepaths)
    for batch in fou.iter_batches(filepaths, 100):
        samples = [fo.Sample(filepath=f) for f in batch]
        ctx.dataset.add_samples(samples)

        num_added += len(batch)
        ctx.set_progress(progress=num_added / num_total)
Note
FiftyOne Teams users can view the current progress of their delegated operations from the Runs page of the Teams App!
For your convenience, all builtin methods of the FiftyOne SDK that support
rendering progress bars provide an optional progress method that you can use
trigger calls to
set_progress()
using the pattern show below:
import fiftyone as fo

def execute(self, ctx):
    images_dir = ctx.params["images_dir"]

    # Custom logic that controls how progress is reported
    def set_progress(pb):
        if pb.complete:
            ctx.set_progress(progress=1, label="Operation complete")
        else:
            ctx.set_progress(progress=pb.progress)

    # Option 1: report progress every five seconds
    progress = fo.report_progress(set_progress, dt=5.0)

    # Option 2: report progress at 10 equally-spaced increments
    # progress = fo.report_progress(set_progress, n=10)

    ctx.dataset.add_images_dir(images_dir, progress=progress)
You can also use the builtin
ProgressHandler class to
automatically forward logging messages to
set_progress()
as label values using the pattern shown below:
import logging
import fiftyone.operators as foo
import fiftyone.zoo as foz

def execute(self, ctx):
    name = ctx.params["name"]

    # Automatically report all `fiftyone` logging messages
    with foo.ProgressHandler(ctx, logger=logging.getLogger("fiftyone")):
        foz.load_zoo_dataset(name, persistent=True)
Operator execution ¶¶
All operators must implement
execute(), which is
where their main actions are performed.
The execute() method
takes an execution context as input whose
ctx.params dict has been hydrated with parameters provided either by the
user by filling out the operator’s input form or
directly provided by the operation that triggered it. The method can optionally
return a dict of results values that will be made available via ctx.results
when the operator’s output form is rendered.
Synchronous execution ¶¶
Your execution method is free to make use of the full power of the FiftyOne SDK and any external dependencies that it needs.
For example, you might perform inference on a model:
import fiftyone.zoo as foz

def execute(self, ctx):
    name = ctx.params["name"]
    label_field = ctx.params["label_field"]
    confidence_thresh = ctx.params.get("confidence_thresh", None)

    model = foz.load_zoo_model(name)
    ctx.view.apply_model(
        model, label_field=label_field, confidence_thresh=confidence_thresh
    )

    num_predictions = ctx.view.count(f"{label_field}.detections")
    return {"num_predictions": num_predictions}
Note
When an operator’s
execute() method
throws an error it will be displayed to the user in the browser.
Asynchronous execution ¶¶
The execute() method
can also be async:
import aiohttp

async def execute(self, ctx):
    # do something async
    async with aiohttp.ClientSession() as session:
        async with session.get(url) as resp:
            r = await resp.json()
Operator composition ¶¶
Many operators are designed to be composed with other operators to build up
more complex behaviors. You can trigger other operations from within an
operator’s execute()
method via ctx.ops and
ctx.trigger.
The ctx.ops property of an
execution context exposes all builtin
Python and
JavaScript
in a conveniently documented functional interface. For example, many operations
involve updating the current state of the App:
def execute(self, ctx):
    # Dataset
    ctx.ops.open_dataset("...")
    ctx.ops.reload_dataset()

    # View/sidebar
    ctx.ops.set_view(name="...")  # saved view by name
    ctx.ops.set_view(view=view)  # arbitrary view
    ctx.ops.clear_view()
    ctx.ops.clear_sidebar_filters()

    # Selected samples
    ctx.ops.set_selected_samples([...]))
    ctx.ops.clear_selected_samples()

    # Selected labels
    ctx.ops.set_selected_labels([...])
    ctx.ops.clear_selected_labels()

    # Panels
    ctx.ops.open_panel("Embeddings")
    ctx.ops.close_panel("Embeddings")
The ctx.trigger
property is a lower-level function that allows you to invoke arbitrary
operations by providing their URI and parameters, including all builtin
operations as well as any operations installed via custom plugins. For example,
here’s how to trigger the same App-related operations from above:
def execute(self, ctx):
    # Dataset
    ctx.trigger("open_dataset", params=dict(name="..."))
    ctx.trigger("reload_dataset")  # refreshes the App

    # View/sidebar
    ctx.trigger("set_view", params=dict(name="..."))  # saved view by name
    ctx.trigger("set_view", params=dict(view=view._serialize()))  # arbitrary view
    ctx.trigger("clear_view")
    ctx.trigger("clear_sidebar_filters")

    # Selected samples
    ctx.trigger("set_selected_samples", params=dict(samples=[...]))
    ctx.trigger("clear_selected_samples")

    # Selected labels
    ctx.trigger("set_selected_labels", params=dict(labels=[...]))
    ctx.trigger("clear_selected_labels")

    # Panels
    ctx.trigger("open_panel", params=dict(name="Embeddings"))
    ctx.trigger("close_panel", params=dict(name="Embeddings"))
Generator execution ¶¶
If your operator’s config declares that it is a
generator via execute_as_generator=True, then its
execute() method should
yield calls to
ctx.ops methods or
ctx.trigger(),
both of which trigger another operation and return a
GeneratedMessage
instance containing the result of the invocation.
For example, a common generator pattern is to use the builtin set_progress
operator to render a progress bar tracking the progress of an operation:
def execute(self, ctx):
    # render a progress bar tracking the execution
    for i in range(n):
        # [process a chunk here]

        # Option 1: ctx.ops
        yield ctx.ops.set_progress(progress=i/n, label=f"Processed {i}/{n}")

        # Option 2: ctx.trigger
        yield ctx.trigger(
            "set_progress",
            dict(progress=i/n, label=f"Processed {i}/{n}"),
        )
Note
Check out the VoxelGPT plugin for a more sophisticated example of using generator execution to stream an LLM’s response to a panel.
Accessing secrets ¶¶
Some plugins may require sensitive information such as API tokens and login credentials in order to function. Any secrets that a plugin requires are in its fiftyone.yml.
For example, the @voxel51/annotation plugin declares the following secrets:
secrets:
  - FIFTYONE_CVAT_URL
  - FIFTYONE_CVAT_USERNAME
  - FIFTYONE_CVAT_PASSWORD
  - FIFTYONE_CVAT_EMAIL
  - FIFTYONE_LABELBOX_URL
  - FIFTYONE_LABELBOX_API_KEY
  - FIFTYONE_LABELSTUDIO_URL
  - FIFTYONE_LABELSTUDIO_API_KEY
As the naming convention implies, any necessary secrets are provided by users by setting environment variables with the appropriate names. For example, if you want to use the CVAT backend with the @voxel51/annotation plugin, you would set:
FIFTYONE_CVAT_URL=...
FIFTYONE_CVAT_USERNAME=...
FIFTYONE_CVAT_PASSWORD=...
FIFTYONE_CVAT_EMAIL=...
At runtime, the plugin’s execution context
is automatically hydrated with any available secrets that are declared by the
plugin. Operators can access these secrets via the ctx.secrets dict:
def execute(self, ctx):
   url = ctx.secrets["FIFTYONE_CVAT_URL"]
   username = ctx.secrets["FIFTYONE_CVAT_USERNAME"]
   password = ctx.secrets["FIFTYONE_CVAT_PASSWORD"]
   email = ctx.secrets["FIFTYONE_CVAT_EMAIL"]
Operator outputs ¶¶
Operators can optionally implement
resolve_output()
to define read-only output forms that are presented to the user as a modal in
the App after the operator’s execution completes.
The basic objective of
resolve_output()
is to define properties that describe how to render the values in ctx.results
for the user. As with input forms, you can use the
fiftyone.operators.types module to define the output properties.
For example, the output form below renders the number of samples ( count)
computed during the operator’s execution:
def execute(self, ctx):
    # computation here...

    return {"count": count}

def resolve_output(self, ctx):
    outputs = types.Object()
    outputs.int(
        "count",
        label="Count",
        description=f"The number of samples in the current {target}",
    )
    return types.Property(outputs)
Note
All properties in output forms are implicitly rendered as read-only.
Operator placement ¶¶
By default, operators are only accessible from the
operator browser. However, you can place a custom
button, icon, menu item, etc. in the App that will trigger the operator when
clicked in any location supported by the
types.Places enum.
For example, you can use:
types.Places.SAMPLES_GRID_ACTIONS
types.Places.SAMPLES_GRID_SECONDARY_ACTIONS
types.Places.SAMPLES_VIEWER_ACTIONS
types.Places.EMBEDDINGS_ACTIONS
types.Places.HISTOGRAM_ACTIONS
types.Places.MAP_ACTIONS
You can add a placement for an operator by implementing the
resolve_placement()
method as demonstrated below:
Developing panels ¶¶
Panels are miniature full-featured data applications that you can open in App spaces and interactively manipulate to explore your dataset and update/respond to updates from other spaces that are currently open in the App.
Panels can be defined in either Python or JS, and FiftyOne comes with a number of builtin panels for common tasks.
Panels can be scoped to the App’s grid view or modal view via their config. Grid panels enable extensibility at the macro level, allowing you to work with entire datasets or views, while modal panels provide extensibility at the micro level, focusing on individual samples and scenarios.
Panels, like operators, can make use of the
fiftyone.operators.types module and the
@fiftyone/operators package, which define a
rich builtin type system that panel developers can use to implement the layout
and associated events that define the panel.
Panels can trigger both Python and JS operators, either programmatically or by interactively launching a prompt that users can fill out to provide the necessary parameters for the operator’s execution. This powerful composability allows panels to define interactive workflows that guide the user through executing workflows on their data and then interactively exploring and analyzing the results of the computation.
Panels can also interact with other components of the App, such as responding to changes in (or programmatically updating) the current dataset, view, current selection, or active sample in the modal.
Panel interface ¶¶
The code block below describes the Python interface for defining panels. We’ll dive into each component of the interface in more detail in the subsequent sections.
Note
See this section for more information on developing panels in JS.
import fiftyone.operators as foo
import fiftyone.operators.types as types
class ExamplePanel(foo.Panel):
@property
def config(self):
return foo.PanelConfig(
# The panel's URI: f"{plugin_name}/{name}"
name="example_panel", # required
# The display name of the panel in the "+" menu
label="Example panel", # required
# Custom icons to use in the "+"" menu
# Can be a URL, a local path in the plugin directory, or the
# name of a MUI icon: https://marella.me/material-icons/demo
icon="/assets/icon.svg",
light_icon="developer_mode", # light theme only
dark_icon="developer_mode", # dark theme only
# Whether to allow multiple instances of the panel to be opened
allow_multiple=False,
# Whether the panel should be available in the grid, modal, or both
# Possible values: "grid", "modal", "grid modal"
surfaces="grid", # default = "grid"
# Markdown-formatted text that describes the panel. This is
# rendered in a tooltip when the help icon in the panel
# title is hovered over
help_markdown="A description of the panel",
)
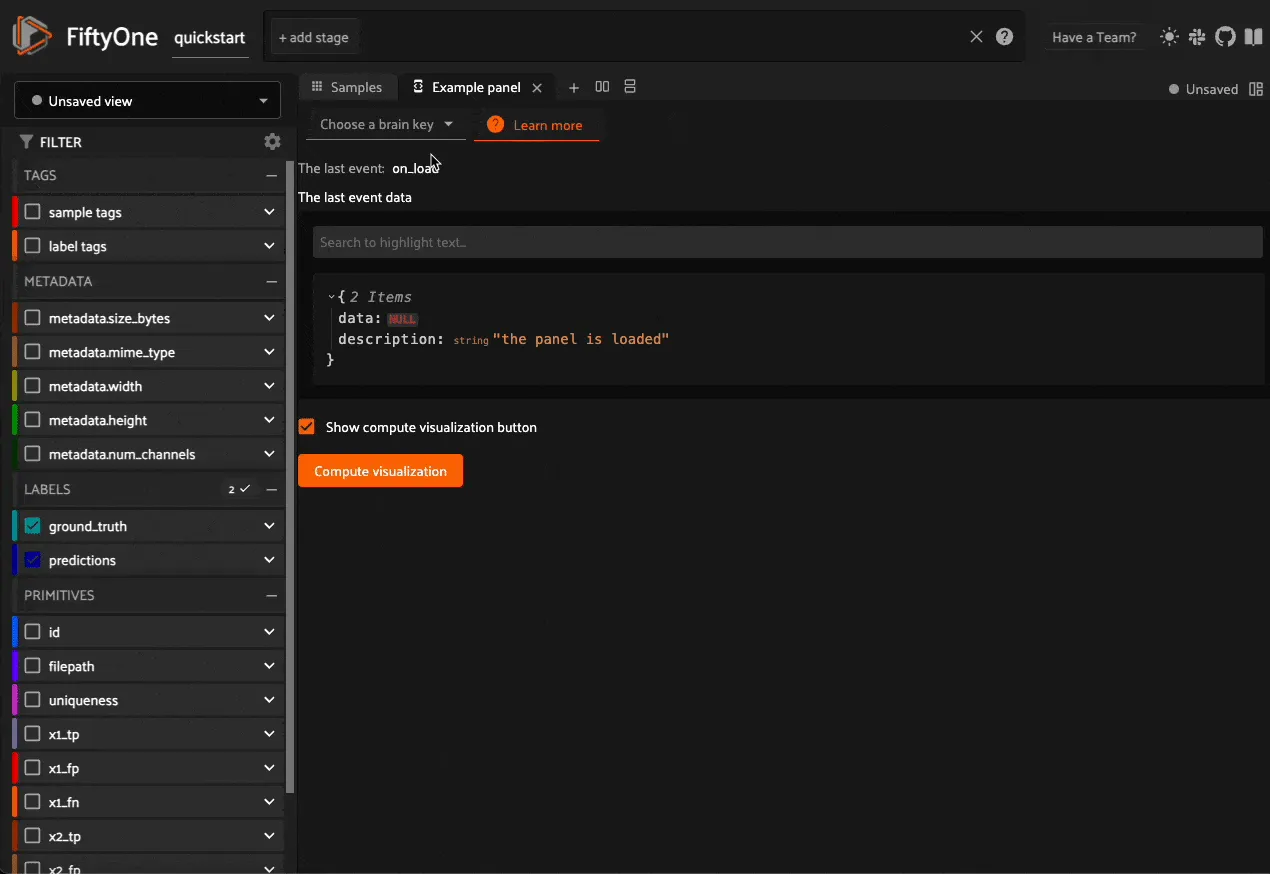
def render(self, ctx):
"""Implement this method to define your panel's layout and events.
This method is called after every panel event is executed (panel
load, button callback, context change event, etc).
Returns:
a `types.Property` defining the panel's components
"""
panel = types.Object()
brain_keys = ctx.panel.get_state("brain_keys", [])
# Define a menu of actions for the panel
menu = panel.menu("menu", variant="square", color="51")
menu.enum(
"brain_key",
label="Choose a brain key", # placeholder text
values=brain_keys,
on_change=self.on_change_brain_key, # custom event callback
)
menu.btn(
"learn_more",
label="Learn more", # tooltip text
icon="help", # material UI icon
on_click=self.on_click_learn_more, # custom event callback
)
# Define components that appear in the panel's main body
panel.str("event", label="The last event", view=types.LabelValueView())
panel.obj(
"event_data", label="The last event data", view=types.JSONView()
)
# Display a checkbox to toggle between plot and compute visualization button
show_compute_visualization_btn = ctx.panel.get_state(
"show_start_button", True
)
panel.bool(
"show_start_button",
label="Show compute visualization button",
on_change=self.on_change_show_start_button,
)
# You can use conditional logic to dynamically change the layout
# based on the current panel state
if show_compute_visualization_btn:
# Define a button with a custom on click event
panel.btn(
"start",
label="Compute visualization", # button text
on_click=self.on_click_start, # custom event callback
variant="contained", # button style
)
else:
# Define an interactive plot with custom callbacks
panel.plot(
"embeddings",
config={}, # plotly config
layout={}, # plotly layout config
on_selected=self.on_selected_embeddings, # custom event callback
height="400px",
)
return types.Property(
panel, view=types.GridView(orientation="vertical")
)
#######################################################################
# Builtin events
#######################################################################
def on_load(self, ctx):
"""Implement this method to set panel state/data when the panel
initially loads.
"""
event = {
"data": None,
"description": "the panel is loaded",
}
ctx.panel.set_state("event", "on_load")
ctx.panel.set_data("event_data", event)
# Get the list of brain keys to populate `brain_key` dropdown
visualization_keys = ctx.dataset.list_brain_runs("visualization")
ctx.panel.set_state("brain_keys", visualization_keys)
# Show compute visualization button by default
ctx.panel.set_state("show_start_button", True)
def on_unload(self, ctx):
"""Implement this method to set panel state/data when the panel is
being closed.
"""
event = {
"data": None,
"description": "the panel is unloaded",
}
ctx.panel.set_state("event", "on_unload")
ctx.panel.set_data("event_data", event)
def on_change_ctx(self, ctx):
"""Implement this method to set panel state/data when any aspect
of the execution context (view, selected samples, filters, etc.) changes.
The current execution context will be available via ``ctx``.
"""
event = {
"data": {
"view": ctx.view._serialize(),
"selected": ctx.selected,
"has_custom_view": ctx.has_custom_view,
},
"description": "the current ExecutionContext",
}
ctx.panel.set_state("event", "on_change_ctx")
ctx.panel.set_data("event_data", event)
def on_change_dataset(self, ctx):
"""Implement this method to set panel state/data when the current
dataset is changed.
The new dataset will be available via ``ctx.dataset``.
"""
event = {
"data": ctx.dataset.name,
"description": "the current dataset name",
}
ctx.panel.set_state("event", "on_change_dataset")
ctx.panel.set_data("event_data", event)
def on_change_view(self, ctx):
"""Implement this method to set panel state/data when the current
view is changed.
The new view will be available via ``ctx.view``.
"""
event = {
"data": ctx.view._serialize(),
"description": "the current view",
}
ctx.panel.set_state("event", "on_change_view")
ctx.panel.set_data("event_data", event)
def on_change_spaces(self, ctx):
"""Implement this method to set panel state/data when the current
spaces layout changes.
The current spaces layout will be available via ``ctx.spaces``.
"""
event = {
"data": ctx.spaces,
"description": "the current spaces layout",
}
ctx.panel.set_state("event", "on_change_spaces")
ctx.panel.set_data("event_data", event)
def on_change_current_sample(self, ctx):
"""Implement this method to set panel state/data when a new sample
is loaded in the Sample modal.
The ID of the new sample will be available via
``ctx.current_sample``.
"""
event = {
"data": ctx.current_sample,
"description": "the current sample",
}
ctx.panel.set_state("event", "on_change_current_sample")
ctx.panel.set_data("event_data", event)
def on_change_selected(self, ctx):
"""Implement this method to set panel state/data when the current
selection changes (eg in the Samples panel).
The IDs of the current selected samples will be available via
``ctx.selected``.
"""
event = {
"data": ctx.selected,
"description": "the current selection",
}
ctx.panel.set_state("event", "on_change_selected")
ctx.panel.set_data("event_data", event)
def on_change_selected_labels(self, ctx):
"""Implement this method to set panel state/data when the current
selected labels change (eg in the Sample modal).
Information about the current selected labels will be available
via ``ctx.selected_labels``.
"""
event = {
"data": ctx.selected_labels,
"description": "the current selected labels",
}
ctx.panel.set_state("event", "on_change_selected_labels")
ctx.panel.set_data("event_data", event)
def on_change_extended_selection(self, ctx):
"""Implement this method to set panel state/data when the current
extended selection changes.
The IDs of the current extended selection will be available via
``ctx.extended_selection``.
"""
event = {
"data": ctx.extended_selection,
"description": "the current extended selection",
}
ctx.panel.set_state("event", "on_change_extended_selection")
ctx.panel.set_data("event_data", event)
def on_change_group_slice(self, ctx):
"""Implement this method to set panel state/data when the current
group slice changes.
The current group slice will be available via ``ctx.group_slice``.
"""
event = {
"data": ctx.group_slice,
"description": "the current group slice",
}
ctx.panel.set_state("event", "on_change_group_slice")
ctx.panel.set_data("event_data", event)
#######################################################################
# Custom events
# These events are defined by user code above and, just like builtin
# events, take `ctx` as input and are followed by a call to render()
#######################################################################
def on_change_brain_key(self, ctx):
# Load expensive content based on current `brain_key`
brain_key = ctx.panel.get_state("menu.brain_key")
results = ctx.dataset.load_brain_results(brain_key)
# Format results for plotly
x, y = zip(*results.points.tolist())
ids = results.sample_ids
plot_data = [\
{"x": x, "y": y, "ids": ids, "type": "scatter", "mode": "markers"}\
]
# Store large content as panel data for efficiency
ctx.panel.set_data("embeddings", plot_data)
# Show plot with embeddings data instead of the compute visualization button
ctx.panel.set_state("show_start_button", False)
def on_click_start(self, ctx):
# Launch an interactive prompt for user to execute an operator
ctx.prompt("@voxel51/brain/compute_visualization")
# Lightweight state update
ctx.panel.set_state("show_start_button", False)
def on_click_learn_more(self, ctx):
# Trigger a builtin operation via `ctx.ops`
url = "https://docs.voxel51.com/plugins/developing_plugins.html"
ctx.ops.notify(f"Check out {url} for more information")
def on_selected_embeddings(self, ctx):
# Get selected points from event params
selected_points = ctx.params.get("data", [])
selected_sample_ids = [d.get("id", None) for d in selected_points]
# Conditionally trigger a builtin operation via `ctx.ops`
if len(selected_sample_ids) > 0:
ctx.ops.set_extended_selection(selected_sample_ids)
def on_change_show_start_button(self, ctx):
# Get current state of the checkbox on change
current_state = ctx.params.get("value", None)
def register(p):
"""Always implement this method and register() each panel that your
plugin defines.
"""
p.register(ExamplePanel)
Note
Remember that you must also include the panel’s name in the plugin’s fiftyone.yml:
panels:
  - example_panel
Panel config ¶¶
Every panel must define a
config property that
defines its name, display name, surfaces, and other optional metadata about its
behavior:
@property
def config(self):
    return foo.PanelConfig(
        # The panel's URI: f"{plugin_name}/{name}"
        name="example_panel",  # required

        # The display name of the panel in the "+" menu
        label="Example panel",  # required

        # Custom icons to use in the "+"" menu
        # Can be a URL, a local path in the plugin directory, or the
        # name of a MUI icon: https://marella.me/material-icons/demo
        icon="/assets/icon.svg",
        light_icon="/assets/icon-light.svg",  # light theme only
        dark_icon="/assets/icon-dark.svg",  # dark theme only

        # Whether to allow multiple instances of the panel to be opened
        allow_multiple=False,

        # Whether the panel should be available in the grid, modal, or both
        # Possible values: "grid", "modal", "grid modal"
        surfaces="grid",  # default = "grid"

        # Markdown-formatted text that describes the panel. This is
        # rendered in a tooltip when the help icon in the panel
        # title is hovered over
        help_markdown="A description of the panel",
    )
The surfaces key defines the panel’s scope:
-
Grid panels can be accessed from the
+button in the App’s grid view, which allows you to build macro experiences that work with entire datasets or views -
Modal panels can be accessed from the
+button in the App’s modal view, which allows you to build interactions that focus on individual samples and scenarios
Note
For an example of a modal panel, refer to the label count panel.
Execution context ¶¶
An ExecutionContext is
passed to each of the panel’s methods at runtime. This ctx contains static
information about the current state of the App (dataset, view, panel,
selection, etc) as well as dynamic information about the panel’s current
state and data.
See this section for a full description of the execution context.
Panel state and data ¶¶
Panels provide two mechanisms for persisting information: panel state and panel data.
Basic structure ¶¶
Panel state can be accessed and updated via ctx.panel.state, and panel data
can be updated (but not accessed) via ctx.panel.data.
Under the hood, panel state and data is merged into a single nested object that
maps 1-1 to the structure and naming of the properties defined by the panel’s
render() method.
The example code below shows how to access and update panel state.
Note
Since panel state and panel data are merged into a single object, it is important to avoid naming conflicts between state and data keys. If a key is present in both panel state and data, the value in panel data will be used.
class CounterPanel(foo.Panel):
    @property
    def config(self):
        return foo.PanelConfig(
            name="counter_panel", label="Counter Panel", icon="123"
        )

    def on_load(self, ctx):
        ctx.panel.state.v_stack = {"h_stack": {"count": 3}}

    def increment(self, ctx):
        count = ctx.panel.state.get("v_stack.h_stack.count", 0)
        ctx.panel.state.set("v_stack.h_stack.count", count + 1)

    def decrement(self, ctx):
        count = ctx.panel.get_state("v_stack.h_stack.count", 0)
        ctx.panel.set_state("v_stack.h_stack.count", count - 1)

    def render(self, ctx):
        panel = types.Object()

        # Define a vertical stack object with the name 'v_stack'
        # key: 'v_stack'
        v_stack = panel.v_stack("v_stack", align_x="center", gap=2)

        # Define a horizontal stack object with the name 'h_stack' on 'v_stack'
        # key: 'v_stack.h_stack'
        h_stack = v_stack.h_stack("h_stack", align_y="center")

        # Get state
        v_stack_state = ctx.panel.state.v_stack
        h_stack_state = v_stack_state["h_stack"] if v_stack_state is not None else None
        count = h_stack_state["count"] if h_stack_state is not None else 0

        # Add a message to the horizontal stack object with the name 'count'
        # key: 'v_stack.h_stack.count'
        h_stack.message("count", f"Count: {count}")

        # Add a button to the horizontal stack object with the name 'increment'
        # key: 'v_stack.h_stack.increment'
        h_stack.btn(
            "increment",
            label="Increment",
            icon="add",
            on_click=self.increment,
            variant="contained",
        )

        # Add a button to the horizontal stack object with the name 'decrement'
        # key: 'v_stack.h_stack.count'
        h_stack.btn(
            "decrement",
            label="Decrement",
            icon="remove",
            on_click=self.decrement,
            variant="contained",
        )

        return types.Property(panel)
Panel state ¶¶
Panel state is included in every
render() call and event
callback and is analogous to operator parameters:
-
The values of any components defined in a panel’s
render()method are available via corresponding state properties of the same name -
The current panel state is readable during a panel’s execution
def render(self, ctx):
    panel = types.Object()

    menu = panel.menu("menu", ...)
    actions = menu.btn_group("actions")
    actions.enum(
        "mode",
        values=["foo", "bar"],
        on_change=self.on_change_mode,
        ...
    )

    panel.str("user_input", default="spam")

def on_change_mode(self, ctx):
    # Object-based interface
    mode = ctx.panel.state.menu.actions.mode
    user_input = ctx.panel.state.user_input

    # Functional interface
    mode = ctx.panel.get_state("menu.actions.mode")
    user_input = ctx.panel.get_state("user_input")
Panel state can be programmatically updated in panel methods via the two syntaxes shown below:
def on_change_view(self, ctx):
    # Top-level state attributes can be modified by setting properties
    ctx.panel.state.foo = "bar"

    # Use set_state() to efficiently apply nested updates
    ctx.panel.set_state("foo.bar", {"spam": "eggs"})
Warning
Don’t directly modify panel state in
render(), just like how
setState() should not be called in
React’s
render().
Instead set panel state in event callbacks as demonstrated above.
Panel data ¶¶
Panel data is designed to store larger content such as plot data that is loaded once and henceforward stored only clientside to avoid unnecessary/expensive reloads and serverside serialization during the lifecycle of the panel.
def on_load(self, ctx):
    self.update_plot_data(ctx)

def render(self, ctx):
    panel = types.Object()

    menu = panel.menu("menu", ...)
    actions = menu.btn_group("actions")
    actions.enum(
        "brain_key",
        label="Brain key",
        values=["foo", "bar"],
        default=None,
        on_change=self.update_plot_data,
    )

    panel.plot("embeddings", config=..., layout=...)

    return types.Property(panel)

def update_plot_data(self, ctx):
    brain_key = ctx.panel.state.menu.actions.brain_key
    if brain_key is None:
        return

    # Load expensive content based on current `brain_key`
    results = ctx.dataset.load_brain_results(brain_key)

    # Store large content as panel data for efficiency
    data = {"points": results.points, ...}
    ctx.panel.set_data("embeddings", data)
Note how the panel’s on_load() hook is implemented so that panel data can be
hydrated when the panel is initially loaded, and then subsequently plot data is
loaded only when the brain_key property is modified.
Note
Panel data is never readable in Python; it is only implicitly used by the types you define when they are rendered clientside.
Execution store ¶¶
Panels can store data in the execution store, which is a key-value store that is persisted beyond the lifetime of the panel. This is useful for storing information that should persist across panel instances and App sessions, such as cached data, long-lived panel state, or user preferences.
You can create/retrieve execution stores scoped to the current ctx.dataset
via ctx.store:
def on_load(ctx):
    # Retrieve a store scoped to the current `ctx.dataset`
    # The store is automatically created if necessary
    store = ctx.store("my_store")

    # Load a pre-existing value from the store
    user_choice = store.get("user_choice")

    # Store data with a TTL to ensure it is evicted after `ttl` seconds
    store.set("my_key", {"foo": "bar"}, ttl=60)

    # List all keys in the store
    print(store.list_keys())  # ["user_choice", "my_key"]

    # Retrieve data from the store
    print(store.get("my_key"))  # {"foo": "bar"}

    # Retrieve metadata about a key
    print(store.get_metadata("my_key"))
    # {"created_at": ..., "updated_at": ..., "expires_at": ...}

    # Delete a key from the store
    store.delete("my_key")

    # Clear all data in the store
    store.clear()
Note
Did you know? Any execution stores associated with a dataset are automatically deleted when the dataset is deleted.
For advanced use cases, it is also possible to create and use global stores
that are available to all datasets via the
ExecutionStore class:
from fiftyone.operators import ExecutionStore

# Retrieve a global store
# The store is automatically created if necessary
store = ExecutionStore.create("my_store")

# Store data with a TTL to ensure it is evicted after `ttl` seconds
store.set("my_key", {"foo": "bar"}, ttl=60)

# List all keys in the global store
print(store.list_keys())  # ["my_key"]

# Retrieve data from the global store
print(store.get("my_key"))  # {"foo": "bar"}

# Retrieve metadata about a key
print(store.get_metadata("my_key"))
# {"created_at": ..., "updated_at": ..., "expires_at": ...}

# Delete a key from the global store
store.delete("my_key")

# Clear all data in the global store
store.clear()
Warning
Global stores have no automatic garbage collection, so take care when creating and using global stores whose keys do not utilize TTLs.
Saved workspaces ¶¶
Saved workspaces may contain any number of Python panels!
When a workspace is saved, the current panel state of any panels in the layout is persisted as part of the workspace’s definition. Thus when the workspace is loaded later, all panels will “remember” their state.
Panel data (which may be large), on the other hand, is not explicitly persisted. Instead it should be hydrated when the panel is loaded using the pattern demonstrated here.
Accessing secrets ¶¶
Panels can access secrets defined by their plugin.
At runtime, the panel’s execution context
is automatically hydrated with any available secrets that are declared by the
plugin. Panels can access these secrets via the ctx.secrets dict:
def on_load(self, ctx):
    url = ctx.secrets["FIFTYONE_CVAT_URL"]
    username = ctx.secrets["FIFTYONE_CVAT_USERNAME"]
    password = ctx.secrets["FIFTYONE_CVAT_PASSWORD"]
    email = ctx.secrets["FIFTYONE_CVAT_EMAIL"]
Common patterns ¶¶
Most panels make use of common patterns like callbacks, menus, interactive plots, and walkthrough layouts.
Learning the patterns described below will help you build panels faster and avoid roadblocks along the way.
Note
Check out the panel examples plugin to see a collection of fully-functional panels that demonstrate the common patterns below.
Callbacks ¶¶
Most panel components support callback methods like on_click and on_change
that you can implement to perform operations and trigger state updates when
users interact with the components.
For example, the code below shows how clicking a button or changing the state of a slider can initiate callbacks that trigger operators, open other panels, and programmatically modify the current state.
Note
All callback functions have access to the current
ExecutionContext
via their ctx argument and can use it to get/update panel state and
trigger other operations.
def on_load(self, ctx):
    # Set initial slider state
    ctx.panel.state.slider_value = 5

def open_compute(self, ctx):
    # Launch an interactive prompt for user to execute an operator
    ctx.prompt("@voxel51/brain/compute_visualization")

def open_embeddings(self, ctx):
    # Open embeddings panel
    ctx.trigger("open_panel", params=dict(name="Embeddings"))

def change_value(self, ctx):
    # Grab current slider value from `ctx.params`
    ctx.panel.state.slider_value = (
        ctx.params["value"] or ctx.params["panel_state"]["slider_value"]
    )

def render(self, ctx):
    panel = types.Object()

    # Define buttons that work with on_click callbacks
    panel.btn(
        "button_1",
        label="Compute visualization",
        on_click=self.open_compute,
    )
    panel.btn(
        "button_2",
        label="Open embeddings panel",
        on_click=self.open_embeddings,
    )

    # Define a slider with an `on_change` callback
    slider = types.SliderView(
        data=ctx.panel.state.slider_value, label="Example Slider"
    )
    schema = {"min": 0, "max": 10, "multipleOf": 1}
    panel.int(
        "slider_value", view=slider, on_change=self.change_value, **schema
    )
Note
Did you know? You can use ctx.params in a callback to access the state
of the property that triggered the action.
Dropdown menus ¶¶
Dropdown menus can be a useful tool to build panels whose layout/content dynamically changes based on the current state of the menu.
Here’s an example of a dropdown menu with selectable options that alters the panel layout based on user input.
Note
Panels also support a menu() property that provides a convenient syntax
for defining a group of dropdowns, buttons, etc that can be anchored
to a particular position in your panel (e.g., top-left).
Check out this section for an example panel that
makes use of menu().
class DropdownMenuExample(foo.Panel):
    @property
    def config(self):
        return foo.PanelConfig(
            name="example_dropdown_menu",
            label="Examples: Dropdown Menu",
        )

    def on_load(self, ctx):
        ctx.panel.state.selection = None

    def alter_selection(self, ctx):
        ctx.panel.state.selection = ctx.params["value"]

    def refresh_page(self, ctx):
        ctx.ops.reload_dataset()

    def reload_samples(self, ctx):
        ctx.ops.reload_samples()

    def say_hi(self, ctx):
        ctx.ops.notify("Hi!", variant="success")

    def render(self, ctx):
        panel = types.Object()

        panel.md(
            """
            ### Welcome to the Python Panel Dropdown Menu Example
            Use the menu below to select what you would like to do next!

            ---

        """,
            name="header",
            width=50,  # 50% of current panel width
            height="200px",
        )

        # Define a dropdown menu and add choices
        dropdown = types.DropdownView()
        dropdown.add_choice(
            "refresh",
            label="Display Refresh Button",
            description="Displays button that will refresh the FiftyOne App",
        )
        dropdown.add_choice(
            "reload_samples",
            label="Display Reload Samples Button",
            description="Displays button that will reload the samples view",
        )
        dropdown.add_choice(
            "say_hi",
            label="Display Hi Button",
            description="Displays button that will say hi",
        )

        # Add dropdown menu to the panel as a view and use the `on_change`
        # callback to trigger `alter_selection`
        panel.view(
            "dropdown",
            view=dropdown,
            label="Dropdown Menu",
            on_change=self.alter_selection,
        )

        # Change panel visual state dependent on dropdown menu selection
        if ctx.panel.state.selection == "refresh":
            panel.btn(
                "refresh",
                label="Refresh FiftyOne",
                on_click=self.refresh_page,
                variant="contained",
            )
        elif ctx.panel.state.selection == "reload_samples":
            panel.btn(
                "reload_samples",
                label="Reload Samples",
                on_click=self.reload_samples,
                variant="contained",
            )
        elif ctx.panel.state.selection == "say_hi":
            panel.btn(
                "say_hi",
                label="Say Hi",
                on_click=self.say_hi,
                variant="contained",
            )

        return types.Property(
            panel,
            view=types.GridView(
                height=100,
                width=100,
                align_x="center",
                align_y="center",
                orientation="vertical",
            ),
        )
Interactive plots ¶¶
Panels provide native support for defining interactive plots that can render data from the current dataset and dynamically update or trigger actions as users interact with the plots.
For example, here’s a panel that displays a histogram of a specified field of the current dataset where clicking a bar loads the corresponding samples in the App.
import fiftyone.operators as foo
import fiftyone.operators.types as types
from fiftyone import ViewField as F

class InteractivePlotExample(foo.Panel):
    @property
    def config(self):
        return foo.PanelConfig(
            name="example_interactive_plot",
            label="Examples: Interactive Plot",
            icon="bar_chart",
        )

    def on_load(self, ctx):
        # Get target field
        target_field = (
            ctx.panel.state.target_field or "ground_truth.detections.label"
        )
        ctx.panel.state.target_field = target_field

        # Compute target histogram for current dataset
        counts = ctx.dataset.count_values(target_field)
        keys, values = zip(*sorted(counts.items(), key=lambda x: x[0]))

        # Store as panel data for efficiency
        ctx.panel.data.histogram = {"x": keys, "y": values, "type": "bar"}

        # Launch panel in a horizontal split view
        ctx.ops.split_panel("example_interactive_plot", layout="horizontal")

    def on_change_view(self, ctx):
        # Update histogram when current view changes
        self.on_load(ctx)

    def on_histogram_click(self, ctx):
        # The histogram bar that the user clicked
        value = ctx.params.get("x")

        # Create a view that matches the selected histogram bar
        field = ctx.panel.state.target_field
        view = _make_matching_view(ctx.dataset, field, value)

        # Load view in App
        if view is not None:
            ctx.ops.set_view(view=view)

    def reset(self, ctx):
        ctx.ops.clear_view()
        self.on_load(ctx)

    def render(self, ctx):
        panel = types.Object()

        panel.plot(
            "histogram",
            layout={
                "title": {
                    "text": "Interactive Histogram",
                    "xanchor": "center",
                    "yanchor": "top",
                    "automargin": True,
                },
                "xaxis": {"title": "Labels"},
                "yaxis": {"title": "Count"},
            },
            on_click=self.on_histogram_click,
            width=100,
        )

        panel.btn(
            "reset",
            label="Reset Chart",
            on_click=self.reset,
            variant="contained",
        )

        return types.Property(
            panel,
            view=types.GridView(
                align_x="center",
                align_y="center",
                orientation="vertical",
                height=100,
                width=100,
                gap=2,
                padding=0,
            ),
        )

def _make_matching_view(dataset, field, value):
    if field.endswith(".label"):
        root_field = field.split(".")[0]
        return dataset.filter_labels(root_field, F("label") == value)
    elif field == "tags":
        return dataset.match_tags(value)
    else:
        return dataset.match(F(field) == value)

Walkthroughs ¶¶
You can use a combination of panel objects like markdown, buttons, arrow navigation, and layout containers to create guided walkthroughs similar to the ones at try.fiftyone.ai.
Here’s an example of a panel that leads the user through multiple steps of a guided workflow.
class WalkthroughExample(foo.Panel):
    @property
    def config(self):
        return foo.PanelConfig(
            name="example_walkthrough",
            label="Examples: Walkthrough",
        )

    def on_load(self, ctx):
        ctx.panel.state.page = 1
        info_table = [\
            {\
                "Dataset Name": f"{ctx.dataset.name}",\
                "Dataset Description": "FiftyOne Quick Start Zoo Dataset",\
                "Number of Samples": f"{ctx.dataset.count()}",\
            },\
        ]

    ctx.panel.state.info_table = info_table

    def go_to_next_page(self, ctx):
        ctx.panel.state.page = ctx.panel.state.page + 1

    def go_to_previous_page(self, ctx):
        ctx.panel.state.page = ctx.panel.state.page - 1

    def reset_page(self, ctx):
        ctx.panel.state.page = 1

    def open_operator_io(self, ctx):
        ctx.ops.open_panel("OperatorIO")

    def render(self, ctx):
        panel = types.Object()

        # Define a vertical stack to live inside your panel
        stack = panel.v_stack(
            "welcome", gap=2, width=75, align_x="center", align_y="center"
        )
        button_container = types.GridView(
            gap=2, align_x="left", align_y="center"
        )

        page = ctx.panel.state.get("page", 1)

        if page == 1:
            stack.md(
                """
                ### A Tutorial Walkthrough

                Welcome to the FiftyOne App! Here is a great example of what it looks like to create a tutorial style walkthrough via a Python Panel.
            """,
                name="markdown_screen_1",
            )
            stack.media_player(
                "video",
                "https://youtu.be/ad79nYk2keg",
                align_x="center",
                align_y="center",
            )
        elif page == 2:
            stack.md(
                """
                ### Information About Your Dataset

                Perhaps you would like to know some more information about your dataset?
            """,
                name="markdown_screen_2",
            )
            table = types.TableView()
            table.add_column("Dataset Name", label="Dataset Name")
            table.add_column("Dataset Description", label="Description")
            table.add_column("Number of Samples", label="Number of Samples")

            panel.obj(
                name="info_table",
                view=table,
                label="Cool Info About Your Data",
            )
        elif page == 3:
            if ctx.panel.state.operator_status != "opened":
                stack.md(
                    """
                    ### One Last Trick

                    If you want to do something cool, click the button below.
                """,
                    name="markdown_screen_3",
                )
                btns = stack.obj("top_btns", view=button_container)
                btns.type.btn(
                    "open_operator_io",
                    label="Do Something Cool",
                    on_click=self.open_operator_io,
                    variant="contained"
                )
        else:
            stack.md(
                """
                #### How did you get here?
                Looks like you found the end of the walkthrough. Or have you gotten a little lost in the grid? No worries, let's get you back to the walkthrough!
            """
            )
            btns = stack.obj("btns", view=button_container)
            btns.type.btn("reset", label="Go Home", on_click=self.reset_page)

        # Arrow navigation to go to next or previous page
        panel.arrow_nav(
            "arrow_nav",
            forward=page != 3,  # hidden for the last page
            backward=page != 1,  # hidden for the first page
            on_forward=self.go_to_next_page,
            on_backward=self.go_to_previous_page,
        )

        return types.Property(
            panel,
            view=types.GridView(
                height=100, width=100, align_x="center", align_y="center"
            ),
        )

Displaying multimedia ¶¶
Displaying images, videos, and other forms of multimedia is straightforward in panels. You can embed third-party resources like URLs or load multimedia stored in local directories.
Here are some examples of panels that load, render, and manipulate various forms of image and video data.

Type hints ¶¶
Defining the types of your panel’s function arguments allows you to inspect the methods available to an object and will dramatically help you increase your speed of development.
With type hints, your IDE can preview helpful docstrings, trace fiftyone
source code, and see what methods exist on your object during the development
process.
For example, declaring that the ctx variable has type
ExecutionContext allows
you to reveal all of its available methods during development:
from fiftyone.operators import ExecutionContext

def on_load(ctx: ExecutionContext):
    ctx.trigger()
    ctx.ops()
    ctx.secrets()

    # Reveals the remaining methods available to ctx
    ctx.
    ...
Developing JS plugins ¶¶
This section describes how to develop JS-specific plugin components.
Getting Started ¶¶
To start building your own JS plugin, refer to the hello-world-plugin-js repository. This repo serves as a starting point, providing examples of a build process, a JS panel, and a JS operator.
The fiftyone-js-plugin-build package offers a utility for configuring vite to build your JS plugin bundle.
Component types ¶¶
JS plugins may register components to add or customize functionality within the
FiftyOne App. Each component is registered with an activation function. The
component will only be considered for rendering when the activation function
returns true:
-
Panel: JS plugins can register panel components that can be opened by clicking the
+next to any existing panel’s tab -
Component: JS plugins can register generic components that can be used to render operator input and output
Panels and Components ¶¶
Here’s some examples of using panels and components to add your own custom user interface and components to the FiftyOne App.
Hello world panel ¶¶
A simple plugin that renders “Hello world” in a panel would look like this:
import { registerComponent, PluginComponentTypes } from "@fiftyone/plugins";

function HelloWorld() {
    return <h1>Hello world</h1>;
}

registerComponent({
    name: "HelloWorld",
    label: "Hello world",
    component: HelloWorld,
    type: PluginComponentTypes.Panel,
    activator: () => true
});
Adding a custom Panel ¶¶
import * as fop from "@fiftyone/plugins";
import * as fos from "@fiftyone/state";
import * as foa from "@fiftyone/aggregations";
import AwesomeMap from "react-mapping-library";

function CustomPanel() {
    const dataset = useRecoilValue(fos.dataset);
    const view = useRecoilValue(fos.view);
    const filters = useRecoilValue(fos.filters);
    const [aggregate, points, loading] = foa.useAggregation({
        dataset,
        filters,
        view,
    });

    React.useEffect(() => {
        aggregate(
            [\
                new foa.aggregations.Values({\
                    fieldOrExpr: "id",\
                }),\
                new foa.aggregations.Values({\
                    fieldOrExpr: "location.point.coordinates",\
                }),\
            ],
            dataset.name
        );
    }, [dataset, filters, view]);

    if (loading) return <h1>Loading</h1>;

    return <MyMap geoPoints={points} />;
}

fop.registerComponent({
    // component to delegate to
    component: CustomPanel,

    // tell FiftyOne you want to provide a custom panel
    type: PluginComponentTypes.Panel,

    // used for the panel selector button
    label: "Map",

    // only show the Map panel when the dataset has Geo data
    activator: ({ dataset }) => dataset.sampleFields.location,
});
Custom operator view using component plugin ¶¶
Creating and registering a custom view type:
import * as fop from "@fiftyone/plugins";
import { useState } from "react"

function CustomOperatorView(props) {
    // these props are provided to the component used as the view for an
    // operator input/output field
    const { errors, data, id, onChange, path, schema } = props

    // schema may optionally include a view property which contains
    // attributes such label, description, caption for
    // the field. Schema will also provide a type property to indicate the type
    // of value expected for the field (i.e. string, number, object, array, etc.)
    const { default: defaultValue, view, type } = schema

    // Schema may also provide a default value for the field
    const [value, setValue] = useState(defaultValue)

    return (
        <div>
            <label.mdFor={id}>{view.label}</label>
            <input
                value={value}
                id={id}
                type={type}
                onChange={(e) => {
                    // onChange function passed as a prop can be called with
                    // path and value to set the current value for a field
                    onChange(path, e.target.value)
                }}
            />
        </div>
    )
}

fop.registerComponent({
    // unique name you can use later to refer to the component plugin
    name: "CustomOperatorView",

    // component to delegate to
    component: CustomOperatorView,

    // tell FiftyOne you want to provide a custom component
    type: PluginComponentTypes.Component,

    // activate this plugin unconditionally
    activator: () => true,
});
Using the custom component as the view for a Python operator field:
import fiftyone.operators as foo
import fiftyone.operators.types as types

class CustomViewOperator(foo.Operator):
    @property
    def config(self):
        return foo.OperatorConfig(
            name="custom_view_operator",
            label="Custom View Operator",
        )

    def resolve_input(self, ctx):
        inputs = types.Object()
        inputs.str(
            "name",
            label="Name",
            default="FiftyOne",
            # provide the name of a registered component plugin
            view=types.View(component="CustomOperatorView")
        )
        return types.Property(inputs)

    def execute(self, ctx):
        return {}
FiftyOne App state ¶¶
There are a few ways to manage the state of your plugin. By default you should defer to existing state management in the FiftyOne App.
For example, if you want to allow users to select samples, you can use the
@fiftyone/state package.
Interactivity and state ¶¶
If your plugin only has internal state, you can use existing state management to achieve your desired UX. For example, in a 3D visualizer, you might want to use Three.js and its object model, events, and state management. Or just use your own React hooks to maintain your plugin components internal state.
If you want to allow users to interact with other aspects of FiftyOne through
your plugin, you can use the @fiftyone/state package:
// note: similar to react hooks, these must be used in the context
// of a React component

// select a dataset
const selectLabel = fos.useOnSelectLabel();

// in a callback
selectLabel({ id: "labelId", field: "fieldName" });
The example above shows how you can coordinate or surface existing features of
FiftyOne through your plugin via the @fiftyone/state package. This package
provides hooks to access and modify the state of the FiftyOne App.
Recoil, atoms, and selectors ¶¶
You can also use a combination of your own and fiftyone’s recoil atoms and
selectors.
Here’s an example the combines both approaches in a hook that you could call from anywhere where hooks are supported (almost all plugin component types).
import {atom, useRecoilValue, useRecoilState} from 'recoil';

const myPluginmyPluginFieldsState = atom({
    key: 'myPluginFields',
    default: []
})

function useMyHook() {
    const dataset = useRecoilValue(fos.dataset);
    const [fields, setFields] = useRecoilState(myPluginFieldsState);

    return {
        dataset,
        fields,
        addField: (field) => setFields([...fields, field])
    }
}
Panel state ¶¶
Plugins that provide PluginComponentTypes.Panel components should use the
@fiftyone/spaces package to manage their state. This package provides hooks
to allow plugins to manage the state of individual panel instances.
import { usePanelStatePartial, usePanelTitle } from "@fiftyone/spaces";
import { Button } from '@fiftyone/components';

// in your panel component, you can use the usePanelStatePartial hook
// to read and write to the panel state
function MyPanel() {
    const [state, setState] = usePanelStatePartial('choice');
    const setTitle = usePanelTitle();

    React.useEffect(() => {
      setTitle(`My Panel: ${state}`);
    }, [state]);

    return (
      <div>
        <h1>Choice: {state}</h1>
        <Button onClick={() => setState('A')}>A</Button>
        <Button onClick={() => setState('B')}>B</Button>
      </div>
    );
}
Reading settings in your plugin ¶¶
Plugins may support two styles of configuration settings:
-
System-wide plugin settings under the
pluginskey of your App config -
Dataset-specific plugin settings for any subset of the above values on a dataset’s App config.
Plugin settings are used, for example, to allow the user to configure the default camera position of FiftyOne’s builtin 3D visualizer.
Here’s an example of a system-wide plugin setting:
// app_config.json
{
  "plugins": {
    "my-plugin": {
      "mysetting": "foo"
    }
  }
}
And here’s how to customize that setting for a particular dataset:
import fiftyone as fo

dataset = fo.load_dataset("quickstart")
dataset.app_config.plugins["my-plugin"] = {"mysetting": "bar"}
dataset.save()
In your plugin implementation, you can read settings with the useSettings
hook:
const { mysetting } = fop.useSettings("my-plugin");
Note
See the this page page for more information about configuring plugins.
Querying FiftyOne ¶¶
A typical use case for a JS plugin is to provide a unique way of visualizing FiftyOne data. However some plugins may need to also fetch data in a unique way to efficiently visualize it.
For example, a PluginComponentType.Panel plugin rendering a map of geo points
may need to fetch data relative to where the user is currently viewing. In
MongoDB, such a query would look like this:
{
  $geoNear: {
    near: { type: "Point", coordinates: [ -73.99279 , 40.719296 ] },
    maxDistance: 2,
    query: { category: "Parks" },
  }
}
In a FiftyOne plugin this same query can be performed using the
useAggregation() method of the plugin SDK:
import * as fop from "@fiftyone/plugins";
import * as fos from "@fiftyone/state";
import * as foa from "@fiftyone/aggregations";
import * as recoil from "recoil";

function useGeoDataNear() {
    const dataset = useRecoilValue(fos.dataset);
    const view = useRecoilValue(fos.view);
    const filters = useRecoilValue(fos.filters);
    const [aggregate, points, isLoading] = foa.useAggregation({
        dataset,
        filters,
        view,
    });
    const availableFields = findAvailableFields(dataset.sampleFields);
    const [selectedField, setField] = React.useState(availableFields[0]);

    React.useEffect(() => {
        aggregate([\
            new foa.aggregations.Values({\
                fieldOrExpr: "location.point.coordinates",\
            }),\
        ]);
    }, []);

    return {
        points,
        isLoading,
        setField,
        availableFields,
        selectedField,
    };
}

function MapPlugin() {
    const { points, isLoading, setField, availableFields, selectedField } =
        useGeoDataNear();

    return (
        <Map
            points={points}
            onSelectField={(f) => setField(f)}
            selectedField={selectedField}
            locationFields={availableFields}
        />
    );
}

fop.registerComponent({
    name: "MapPlugin",
    label: "Map",
    activator: ({ dataset }) => findAvailableFields(dataset.fields).length > 0,
});
Plugin runtime ¶¶
JS runtime ¶¶
In JS, plugins are loaded from your
plugins directory into the browser. The FiftyOne App
server finds these plugins by looking for package.json files that include
fiftyone as a property. This fiftyone property describes where the plugin
executable (dist) is.
Python runtime ¶¶
Python operators are executed in two ways:
Immediate execution ¶¶
By default, all operations are executed by the plugin server immediately after they are triggered, either programmatically or by the user in the App.
The plugin server is launched by the FiftyOne App as a subprocess that is responsible for loading plugins and executing them. The plugin server is only accessible via ipc. Its interface (similar to JSON rpc) allows for functions to be called over interprocess communication. This allows for user python code to be isolated from core code. It also allows for the operating system to manage the separate process as it exists in the same process tree as the root process (ipython, Jupyter, etc).
Delegated execution ¶¶
Python operations may also be delegated for execution in the background.
When an operation is delegated, the following happens:
-
The operation’s execution context is serialized and stored in the database
-
The connected orchestrator picks up the task and executes it when resources are available
Advanced usage ¶¶
Storing custom runs ¶¶
When users execute builtin methods like annotation, evaluation, and brain methods on their datasets, certain configuration and results information is stored on the dataset that can be accessed later; for example, see managing brain runs.
FiftyOne also provides the ability to store custom runs on datasets, which can be used by plugin developers to persist arbitrary application-specific information that can be accessed later by users and/or plugins.
The interface for creating custom runs is simple:
import fiftyone as fo

dataset = fo.Dataset("custom-runs-example")
dataset.persistent = True

config = dataset.init_run()
config.foo = "bar"  # add as many key-value pairs as you need

# Also possible
# config = fo.RunConfig(foo="bar")

dataset.register_run("custom", config)

results = dataset.init_run_results("custom")
results.spam = "eggs"  # add as many key-value pairs as you need

# Also possible
# results = fo.RunResults(dataset, config, "custom", spam="eggs")

dataset.save_run_results("custom", results)
Note
RunConfig and
RunResults can store any JSON
serializable values.
RunConfig documents must be less
than 16MB, although they are generally far smaller as they are intended to
store only a handful of simple parameters.
RunResults instances are stored in
GridFS and may exceed
16MB. They are only loaded when specifically accessed by a user.
You can access custom runs at any time as follows:
import fiftyone as fo

dataset = fo.load_dataset("custom-runs-example")

info = dataset.get_run_info("custom")
print(info)

results = dataset.load_run_results("custom")
print(results)
{
    "key": "custom",
    "version": "0.22.3",
    "timestamp": "2023-10-26T13:29:20.837595",
    "config": {
        "type": "run",
        "method": null,
        "cls": "fiftyone.core.runs.RunConfig",
        "foo": "bar"
    }
}
{
    "cls": "fiftyone.core.runs.RunResults",
    "spam": "eggs"
}
Managing custom runs ¶¶
FiftyOne provides a variety of methods that you can use to manage custom runs stored on datasets.
Call
list_runs()
to see the available custom run keys on a dataset:
dataset.list_runs()
Use
get_run_info()
to retrieve information about the configuration of a custom run:
info = dataset.get_run_info(run_key)
print(info)
Use init_run()
and
register_run()
to create a new custom run on a dataset:
config = dataset.init_run()
config.foo = "bar"  # add as many key-value pairs as you need

dataset.register_run(run_key, config)
Use
update_run_config()
to update the run config associated with an existing custom run:
dataset.update_run_config(run_key, config)
Use
init_run_results()
and
save_run_results()
to store run results for a custom run:
results = dataset.init_run_results(run_key)
results.spam = "eggs"  # add as many key-value pairs as you need

dataset.save_run_results(run_key, results)

# update existing results
dataset.save_run_results(run_key, results, overwrite=True)
Use
load_run_results()
to load the results for a custom run:
results = dataset.load_run_results(run_key)
Use
rename_run()
to rename the run key associated with an existing custom run:
dataset.rename_run(run_key, new_run_key)
Use
delete_run()
to delete the record of a custom run from a dataset:
dataset.delete_run(run_key)